
- Joined
- Feb 5, 2007
- Messages
- 446
As I now have a few different methods of mapping that seem to be pretty much unique to me, and since a lot of new members have been filtering in lately and I would like to play someone else's content that I haven't already played over 9000 times, and since also I documented the last landscape I made, I have decided to make a tutorial thread. Not just any tutorial thread: Here I will divulge all that I know, or can remember, about mapping that isn't considered common knowledge or very easy to find out (so no definition of every kind of string in the map scripts.
Now, I am the sort who would sprint a marathon, so I'm going to put my best work out first (also it is the only one I've documented the creation of so far ) and show you how to God Mode (read: Take an actual topographical map and turn it into a landscape.) A word of warning: This took three and three-quarter hours, though it did fall in that mystical time that occurs between eleven at night and seven in the morning when time seems to move more quickly than it should.
Step One:
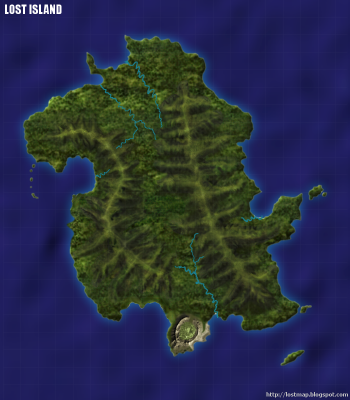
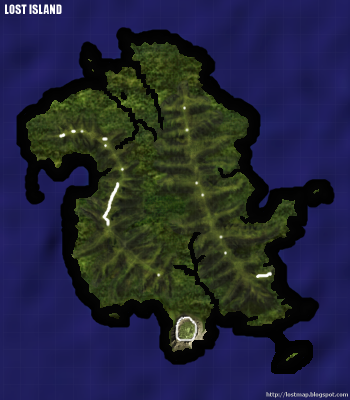
Find a map. Topographical maps work best because they have mountains. I guess this should be obvious, since I said we'd be making this from a map.
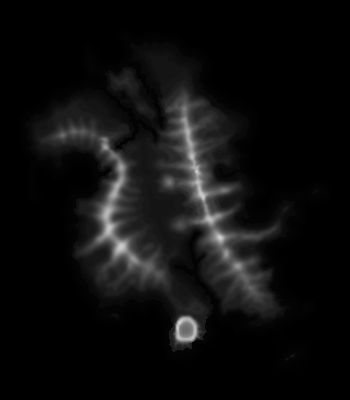
Because of a recent user request, I used this map, which is the island from the television programme Lost.
Step Two:
Open said map in [image editor of your choice]. (I use the GIMP.)
Make a new layer, and set it to Transparency, so you're doing everything over the map without actually changing it.
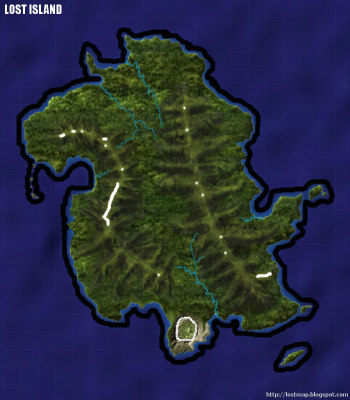
Now, as illustrated, make a thick border around the map but a fair bit away from the coast of almost-black, with an RGB value of 1-1-1. To do this, in GIMP at least (which is free and easy to use!), click on the active foreground colour (It's the block that shows the colour you're using) and set the values next to "Red" "Green" and "Blue" all to 1. This is technically grey, but appears black; It will have a height of 1 in our landscape, which looks like normal water, but it is risen slightly, so you need a border of it to prevent the "coastline glitch" where your island floats several meters off the water (or if you are skilled but still not very careful, a foot or so, which still looks off). Make sure you use Pencil tool, which has a hard edge--Normally a bad thing, but not here. I accidentally used paintbrush for the first step here, which led to more work later on, so don't do it.
Step Three:
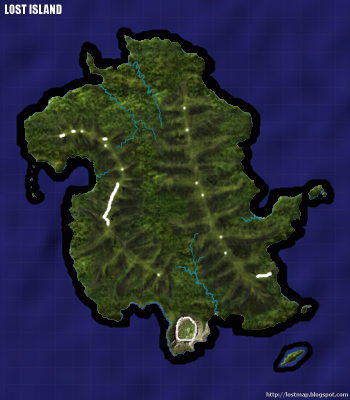
Now change the colour to an RGB value of 2-2-2, the same way as you did for 1-1-1 only now with 2's.
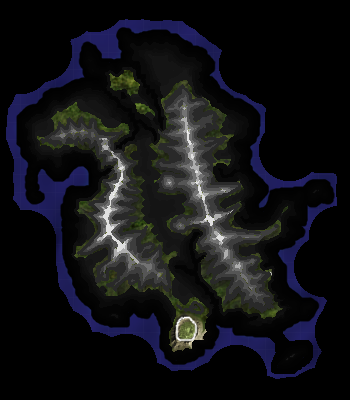
With that, make another bold outline, but make this one closer (and overlapping with) the first bold line, but still leave just a little space between the land on the map and the part you are filling in, as in Black & White the coastlines are unrealistic--Other games with heightmaps more appropriately have land underwater, so it looks seamless, but we need to make it so the land both doesn't float in the air and also maintains its shape, so we'll leave a space for the 3-3-3, which we will do next. You can also see that I marked the peaks of the mountains, but that is unnecessary for now.
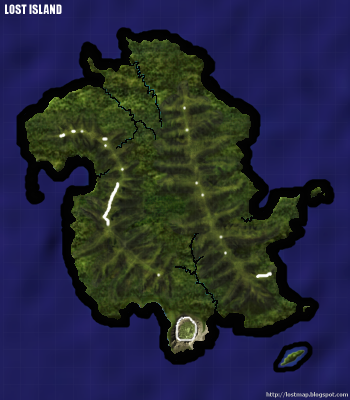
2-2-2 is still water, but you can see the pattern of the land underneath, though it is blue. The creature can walk on it and drink from it, allowing your creature to not become dehydrated even if you have no drink waypoints (which are a later lesson).
Step Four:
Now we get to the subtler part, and the part that requires either a steady hand or a lot of time. The first bit is easy--Use a smaller brush (but still the pencil tool), and make a border slightly on the 2-2-2 area and slightly overlapping with the land (or even just to the edge of it) of 3-3-3. You still have to be careful not to go onto the land too much, but that's not so bad.
Then, if you want your land to look really neat, and you have rivers, because streams look so lame most of the time you can go along the rivers with a single-pixel pencil brush and do them in 3-3-3.
3-3-3 is actually the first kind of land, but it is still bluish and watery, and therefore looks like a river. It is also the second-to-last elevation necessary to step to keep your coastline from getting buggy, since it is the last one with transparency.
Step Five:
Now go along all your coastlines and make a narrow strip, as narrow as you have time for, of 4-4-4, without overlapping anything if you can help it. Mine was only three pixels wide. If your image is larger than 256x256 pixels, you'll need at least two pixels wide. (More on that later.) Make sure especially to be careful around the rivers, as many of them will be one pixel wide and thus easy to mess up. I suggest zooming in closely and doing it pixel by pixel to make it easier.
Also note that that scary vulcano that rises directly from the water there at the southernmost end was so scary I had to make sure to keep my 3-3-3 line out a bit and do my 4-4-4 just a little bit in the water, and didn't touch it again for a while.
An elevation of 4 means dry land, but very low. It is the last elevation that we need to nitpick over to prevent our landscape from jumping; From here, if we wanted one big plateau with sheer cliffs on all borders, we could make it and it would look fine (or at least not glitchy; It would still be a pretty lame landscape, unless you could somehow justify it with a theme when making the script).
I also fixed the island in the bottom-right corner I had forgotten about since step one. That was just accidental, and it received the same treatment as the rest of the map, only later.
 Step Six:
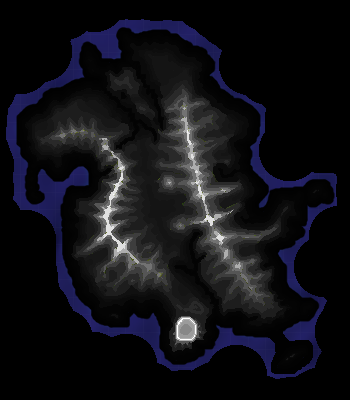
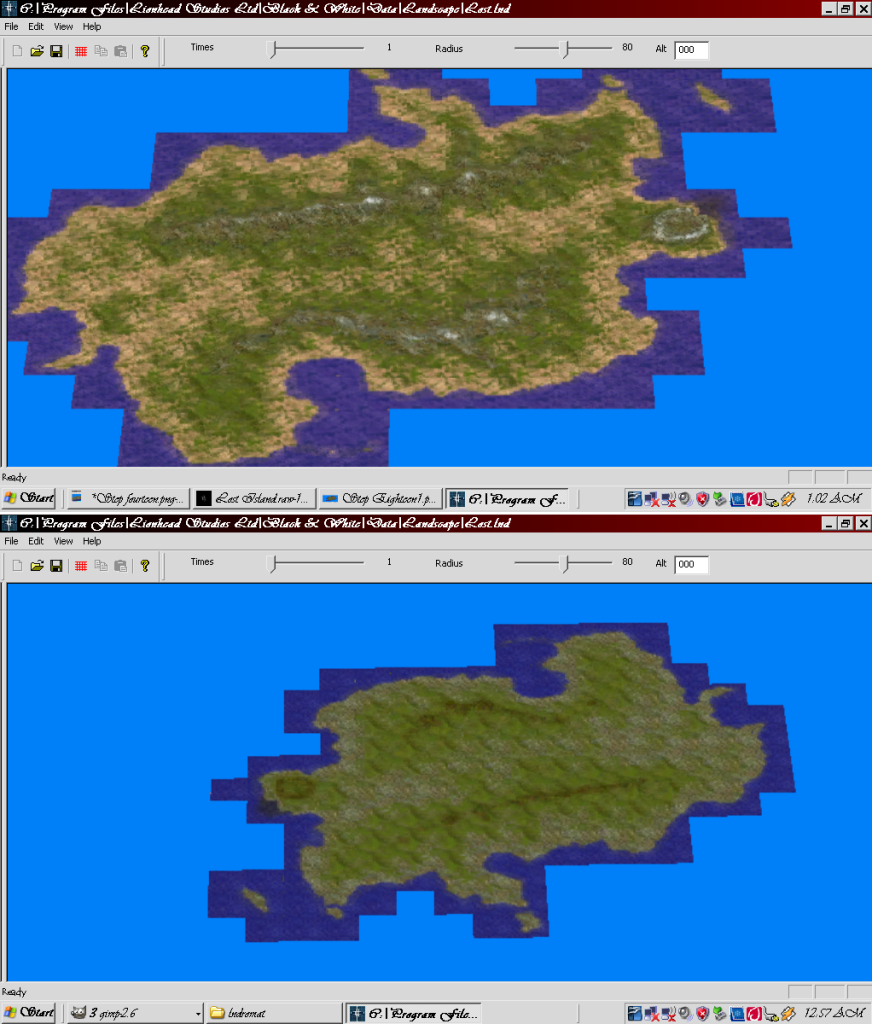
Here is where it becomes more rewarding, as we see some actual progress. From now on, we will refer to our colours as elevations, since I think you get the point that all the RGB values will be the same (or Greyscale), and it is easier to write "we will use 20" or "an elevation of twenty" than "Change the RGB values to 20-20-20."
Incidentally, I used 21 or so for the first part of this step, and 15 for the second part. What we are doing now is roughing out the lowlands, those places that aren't the coast but are still pretty low; For perspective, 255 is the highest elevation and 0 the lowest; 1-3 are all partially water, 0 is fully water, and 4-255 are all normal land. So now, we go over all of our plains and fields in what we feel is the appropriate elevation, covering the big flat portions quickly and easily, as pictured. Don't worry about getting the edges of the plains perfect, we'll do that later; The great thing about being away from the coasts is that we no longer need to worry about a two-point difference in elevation ruining the effect and breaking the fantasy of the entire land.
Then, in the middle of the plains farthest from any mountains (and slightly closer to the water and coasts) make a slightly deeper elevation; I used 15.
Now, we look like we've actually done something! Feels good.
Step Six:
Now we just polish up the above. Use one or two darker colours to frame the coasts and connect them to the plains, and use the darker of the two next to mountains, and if you have anything jutting right out of the water like the vulcano use your Plains elevation to get it off the coast, but make it thin. Also do some lighter colours as you approach the mountains, and use a very dark elevation like 6 (6-6-6 lol) or 8 around the edge of the coasts, if you have time, since when we smooth things out later we won't be able to get too close to the coasts and this prevents little cliffs and spikes from forming, which, frankly, look like crap, even if they are intentional. By the way, here is where you fret about the edges of the plains where they meet the mountains, and getting them about as close as you can to the mountains without using steep elevation. You should probably not exceed 50 in this step, less if you have a flatter land.
Step Seven:
More of the same, but note that I made a 0 elevation border covering the sides and corners. You don't have to do that just yet, but if you do, make sure that you leave a space between the 0 elevation border and your 1 elevation coast. Trust me, that will be easier later on. Also, the islands should be low-elevation; You might be tempted to make them little mountains, but they will be too steep and will have too screwy coastlines because they are small.
Step Eight:
And now we are in the home stretch. From here on only took me one hour. :rolleyes
Mark your mountain tops with about the elevation you think they are; If you want pointy peaks, make the tallest ones only 240 or so, instead of 255, for now.
Now, from your highest elevation, go down about ten or twenty points (or more if you have a steep mountain, and I found that using the next mountain peak's lower elevation and an eyedropper tool easier than changing my colour manually all the time), and draw away from your peak along the contours of your mountain; On the next-lowest peak use the colour you use first for that one, and go further down the taller mountain along the contours of its shape. One way to think of it is as if the bottom part was being filled with water as you coloured it, and each lighter colour was another water level after more was poured on top, and the mountains now are being covered by a descending fog, and each darker colour is where the fog lays as it descends. In other words, each elevation (say, 170) is the same wherever it appears, so a man standing at 170 on a 255-tall mountain would be exactly level with a man standing at the peak of a 170-tall mountain. It sounds simple, but it can be easy to start thinking of the elevations in relation to nearby ones instead of as a whole map. If you try it, you'll know what I mean.
Also, as you descend, the number of units you subtract to get the next lower elevation should decrease each step, unless you have a sheer conical mountain that does not merge with the land smoothly, in which case keep going down by the same amount. A cliff will be a nearly sheer drop, so only colour it every few steps, or even not at all until the end if it is a vertical cliff.
Step Nine:
Now use some darker colours to trace along the mountains and get them very close to merging with the plane; This is the step where you should probably be done with most of the coasts that meet with mountains, too, by placing an elevation between that of the mountain and coast in the part between. Note that the Lost Island mountains look like vertebrae, and so have little spines coming off of the edges, which looks pretty cool, actually.
It now looks kinda like Arctic Camouflage, huh?
Still not touching that vulcano with a ten-foot pole, though.

Step Ten:
Now we fill in the spaces between any protrusions or contours of the mountains; They should be a bit lower (and thus darker), and are also wider than the bands we've been adding, looking more flat like plains.
Then, once we've done that and finished our mountains, find a few shades between the darkest part of the mountain and the lightest of the plains, and make bands of those colours between until they meet up. Congratulation! You have now made a map. If it were loaded now, though, it would still be a bunch of terraces (which might actually be cool...), and, of course, there is still that gap to fill between the 1 and 0 elevations. So work is yet to be done.
Step Eleven:
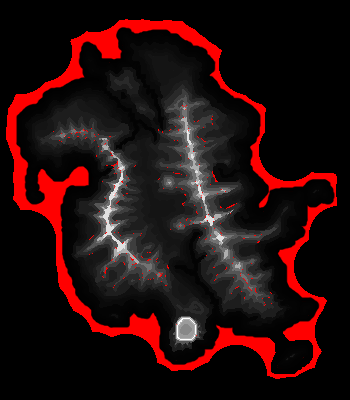
Now, make a new layer (it doesn't matter what kind) and colour it red. Bright, eyeball-stabbing red. Then move it behind the transparent layer we've been painting on, but in front of our map. You will likely see something as below, with ugly red spots all over. Pixel by pixel using the pencil tool, colour in the red pixels with one of the elevations adjoining it. When that is done, you now have an image that with some resizing could be put through lndromat as-is, but it still would not look realistic.
Also, I shouldn't have to tell you that if you didn't fill in the sides with 0 elevation earlier, now is the time to do it. Just don't fill the gap in yet. Trust me, don't do it.

Step Twelve:
Here is why we don't fill in the gap.
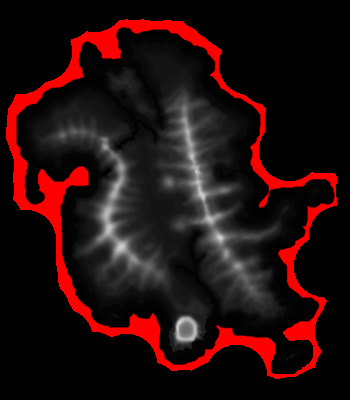
Go to all the places that are not too close to the coast, which will be easy to see because of the red bar that surrounds it, and blur it 80%. I'm not sure if the blur convolve tool works differently in other editors, as i has been a while since I've used them, but in the GIMP just set the bottom bar from 50 to 80. Go over it until everything looks smooth and pretty and almost sort of 3D-shaded, as seen below.
 Step Thirteen:
Now fill in the gap. Make sure there are no pixels that got cut off if you use bucket fill (as you should), and if there are, fill them in with single-pixel pencil tool. You now have a completely greyscale version of the original map. Merge the layer down twice, and you have a single layer. Easy.
Step Fourteen:
Resize the image so that the larger dimension (height or width) is 256 pixels, and make sure the dimensions are locked, so that the smaller dimension changes proportionally.
Then copy and paste it into the middle of a 512x512 Greyscale (make sure it is greyscale or grayscale, NOT RGB colour or another setting) image with a black (0-0-0) background, and save it both as a .raw and a .bmp if your editor can't open .raws, the latter being so that if you messed up you can get back in and fix it and then resave it. Easy stuff.

Step Fifteen:
Holy crap, a lot of steps. Now just run it through lndromat. Lndromat is easy to use, the hard part is getting the .raw heightmaps that follow the parameters--No greater than 256 KB, meaning only the center 256x256 pixels have stuff in them, 512X512 RAW Image format and greyscale. If all that works, there should be no problem.
As to which landscape to use for your textures, Land 5 has the greatest variety and most realistic, Land T (God's Playground) some attractive and novel ones, Land 3 some interesting and unique ones but not great, and Land 4 some volcanic or blasted-looking textures. I went with Land 3 at first, thinking it might have what I was looking for, but then switched to Land 5 because it didn't.
To change what map you get the textures from, just run lndromat again with all the same raw, dds and so forth actions, and choose Land _ instead of the previous option, then save over the old file with the same name.
PROTIP: Make sure when you are naming your landscape to append it .lnd, since lndromat doesn't do it automatically.
Step YE GODS IS IT OVER YET???
No.
But from here on out it gets fun.
Now open it in Surveyor:
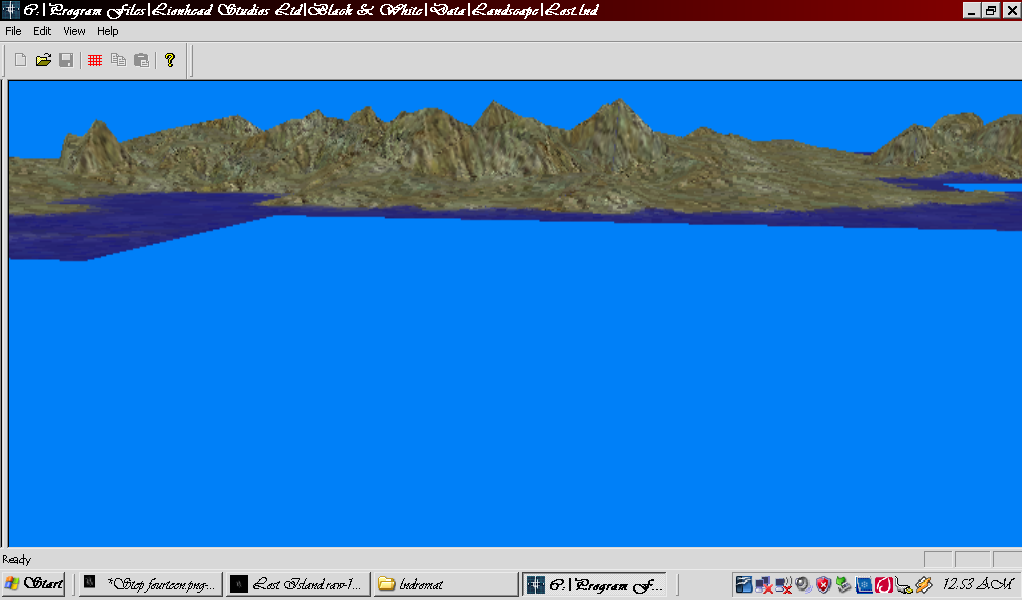
See? It worked. And then Go to
Edit
-->Mode Land Editor.
Then right click on the landscape in the window, and select "Block Countries." Scroll through the schemes until you find one that covers most of your landscape, noting that the top of the scheme is what will be at the highest elevations and the bottom will be the lowest accordingly, and click "Apply to entire land" or something to that effect. Click okay.
Now, you should have a good scheme. I tried a couple until I got it, and one was just to display the architecture of the land.
Finally, when you've got it, save the landscape (Surveyor may take a while, be patient), and open a text file (or Express Map Editor) and paste the following into it:
Having done so, replace YOUR LAND with the correct land name, and use Surveyor to find some more appropriate coordinates, and paste them in the place of the coordinates I have up there. Now, save that file into C:/.../Scripts/Playgrounds as something you can remember, making sure the landscape is also in the Landscapes folder in Data, and select "Preview Map" and "Skirmish" in Express, or just open the game and go to skirmishes. Select the name of your text file.
Voila! You've now done a whole lot more than most people. But there is still more if you are a perfectionist like me.
(Note that the land will appear small at first, this is because there is no stuff on the land for scale except your temple, which always seems to be larger than you remember.)
Step Wait, more?:
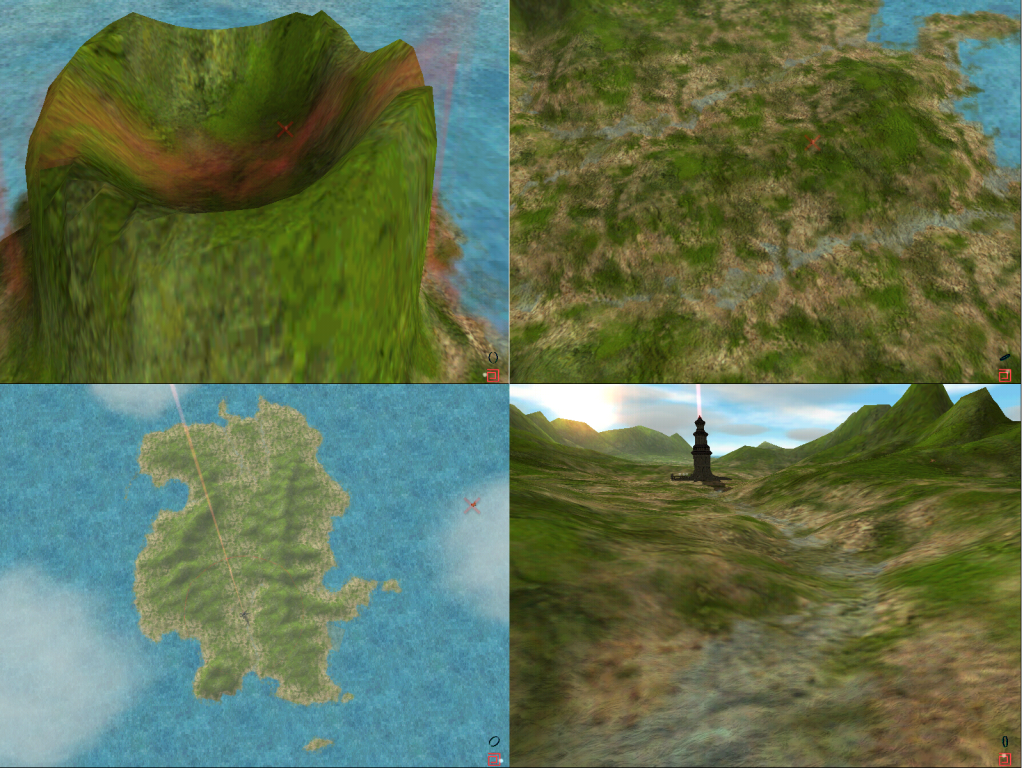
Now, if you have some terrain that is rocky or snowy, but that doesn't appear so in your landscape already, go back into Surveyor and select "Block Countries" over the part you want to edit. Find a scheme that has the right terrain at that height, and push your brush size to 32 and get to painting. If you hit the edges, make sure you go along the same part of the edge on the adjoining square, as well, and if it is on the right or bottom edge let your brush fall halfway off of the block, because otherwise there will be a thin line that is not coloured in later. Continue doing so until the area that you need coloured are so, and repeat for all areas with a different scheme. Then look at it--If you see some lines in between the coloured area (not the blue lines that are added as a grid by Surveyor, but lines of the texure you have on most of the land), go back and make sure you have that edge right on both sides, and that you have gone slightly off the edge on the square where it is at the bottom or right.
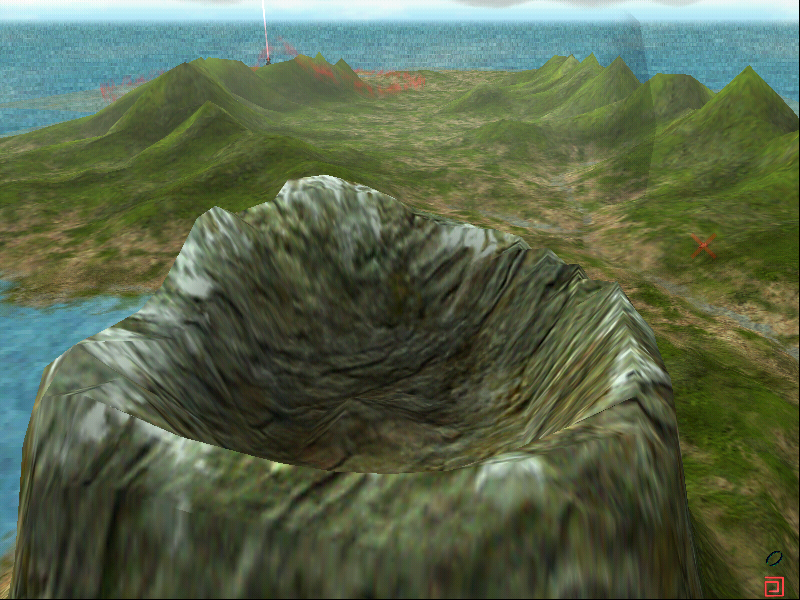
I had to do this for the vulcano, which is snowy and rocky.
The result:
Now all that's left is to make a script for it, but that's a different tutorial altogether.
The next tutorial will be on complicated scripts, and then the one after that I suspect on another method of making landscapes.
Now, I am the sort who would sprint a marathon, so I'm going to put my best work out first (also it is the only one I've documented the creation of so far
) and show you how to God Mode (read: Take an actual topographical map and turn it into a landscape.) A word of warning: This took three and three-quarter hours, though it did fall in that mystical time that occurs between eleven at night and seven in the morning when time seems to move more quickly than it should.Step One:
Find a map. Topographical maps work best because they have mountains. I guess this should be obvious, since I said we'd be making this from a map.
Because of a recent user request, I used this map, which is the island from the television programme Lost.
Step Two:
Open said map in [image editor of your choice]. (I use the GIMP.)
Make a new layer, and set it to Transparency, so you're doing everything over the map without actually changing it.
Now, as illustrated, make a thick border around the map but a fair bit away from the coast of almost-black, with an RGB value of 1-1-1. To do this, in GIMP at least (which is free and easy to use!), click on the active foreground colour (It's the block that shows the colour you're using) and set the values next to "Red" "Green" and "Blue" all to 1. This is technically grey, but appears black; It will have a height of 1 in our landscape, which looks like normal water, but it is risen slightly, so you need a border of it to prevent the "coastline glitch" where your island floats several meters off the water (or if you are skilled but still not very careful, a foot or so, which still looks off). Make sure you use Pencil tool, which has a hard edge--Normally a bad thing, but not here. I accidentally used paintbrush for the first step here, which led to more work later on, so don't do it.
Step Three:
Now change the colour to an RGB value of 2-2-2, the same way as you did for 1-1-1 only now with 2's.
With that, make another bold outline, but make this one closer (and overlapping with) the first bold line, but still leave just a little space between the land on the map and the part you are filling in, as in Black & White the coastlines are unrealistic--Other games with heightmaps more appropriately have land underwater, so it looks seamless, but we need to make it so the land both doesn't float in the air and also maintains its shape, so we'll leave a space for the 3-3-3, which we will do next. You can also see that I marked the peaks of the mountains, but that is unnecessary for now.
2-2-2 is still water, but you can see the pattern of the land underneath, though it is blue. The creature can walk on it and drink from it, allowing your creature to not become dehydrated even if you have no drink waypoints (which are a later lesson).
Step Four:
Now we get to the subtler part, and the part that requires either a steady hand or a lot of time. The first bit is easy--Use a smaller brush (but still the pencil tool), and make a border slightly on the 2-2-2 area and slightly overlapping with the land (or even just to the edge of it) of 3-3-3. You still have to be careful not to go onto the land too much, but that's not so bad.
Then, if you want your land to look really neat, and you have rivers, because streams look so lame most of the time you can go along the rivers with a single-pixel pencil brush and do them in 3-3-3.
3-3-3 is actually the first kind of land, but it is still bluish and watery, and therefore looks like a river. It is also the second-to-last elevation necessary to step to keep your coastline from getting buggy, since it is the last one with transparency.
Step Five:
Now go along all your coastlines and make a narrow strip, as narrow as you have time for, of 4-4-4, without overlapping anything if you can help it. Mine was only three pixels wide. If your image is larger than 256x256 pixels, you'll need at least two pixels wide. (More on that later.) Make sure especially to be careful around the rivers, as many of them will be one pixel wide and thus easy to mess up. I suggest zooming in closely and doing it pixel by pixel to make it easier.
Also note that that scary vulcano that rises directly from the water there at the southernmost end was so scary I had to make sure to keep my 3-3-3 line out a bit and do my 4-4-4 just a little bit in the water, and didn't touch it again for a while.
An elevation of 4 means dry land, but very low. It is the last elevation that we need to nitpick over to prevent our landscape from jumping; From here, if we wanted one big plateau with sheer cliffs on all borders, we could make it and it would look fine (or at least not glitchy; It would still be a pretty lame landscape, unless you could somehow justify it with a theme when making the script).
I also fixed the island in the bottom-right corner I had forgotten about since step one. That was just accidental, and it received the same treatment as the rest of the map, only later.
Here is where it becomes more rewarding, as we see some actual progress. From now on, we will refer to our colours as elevations, since I think you get the point that all the RGB values will be the same (or Greyscale), and it is easier to write "we will use 20" or "an elevation of twenty" than "Change the RGB values to 20-20-20."
Incidentally, I used 21 or so for the first part of this step, and 15 for the second part. What we are doing now is roughing out the lowlands, those places that aren't the coast but are still pretty low; For perspective, 255 is the highest elevation and 0 the lowest; 1-3 are all partially water, 0 is fully water, and 4-255 are all normal land. So now, we go over all of our plains and fields in what we feel is the appropriate elevation, covering the big flat portions quickly and easily, as pictured. Don't worry about getting the edges of the plains perfect, we'll do that later; The great thing about being away from the coasts is that we no longer need to worry about a two-point difference in elevation ruining the effect and breaking the fantasy of the entire land.
Then, in the middle of the plains farthest from any mountains (and slightly closer to the water and coasts) make a slightly deeper elevation; I used 15.
Now, we look like we've actually done something! Feels good.
Step Six:
Now we just polish up the above. Use one or two darker colours to frame the coasts and connect them to the plains, and use the darker of the two next to mountains, and if you have anything jutting right out of the water like the vulcano use your Plains elevation to get it off the coast, but make it thin. Also do some lighter colours as you approach the mountains, and use a very dark elevation like 6 (6-6-6 lol) or 8 around the edge of the coasts, if you have time, since when we smooth things out later we won't be able to get too close to the coasts and this prevents little cliffs and spikes from forming, which, frankly, look like crap, even if they are intentional. By the way, here is where you fret about the edges of the plains where they meet the mountains, and getting them about as close as you can to the mountains without using steep elevation. You should probably not exceed 50 in this step, less if you have a flatter land.
More of the same, but note that I made a 0 elevation border covering the sides and corners. You don't have to do that just yet, but if you do, make sure that you leave a space between the 0 elevation border and your 1 elevation coast. Trust me, that will be easier later on. Also, the islands should be low-elevation; You might be tempted to make them little mountains, but they will be too steep and will have too screwy coastlines because they are small.
Step Eight:
And now we are in the home stretch. From here on only took me one hour. :rolleyes
Mark your mountain tops with about the elevation you think they are; If you want pointy peaks, make the tallest ones only 240 or so, instead of 255, for now.
Now, from your highest elevation, go down about ten or twenty points (or more if you have a steep mountain, and I found that using the next mountain peak's lower elevation and an eyedropper tool easier than changing my colour manually all the time), and draw away from your peak along the contours of your mountain; On the next-lowest peak use the colour you use first for that one, and go further down the taller mountain along the contours of its shape. One way to think of it is as if the bottom part was being filled with water as you coloured it, and each lighter colour was another water level after more was poured on top, and the mountains now are being covered by a descending fog, and each darker colour is where the fog lays as it descends. In other words, each elevation (say, 170) is the same wherever it appears, so a man standing at 170 on a 255-tall mountain would be exactly level with a man standing at the peak of a 170-tall mountain. It sounds simple, but it can be easy to start thinking of the elevations in relation to nearby ones instead of as a whole map. If you try it, you'll know what I mean.
Also, as you descend, the number of units you subtract to get the next lower elevation should decrease each step, unless you have a sheer conical mountain that does not merge with the land smoothly, in which case keep going down by the same amount. A cliff will be a nearly sheer drop, so only colour it every few steps, or even not at all until the end if it is a vertical cliff.
Step Nine:
Now use some darker colours to trace along the mountains and get them very close to merging with the plane; This is the step where you should probably be done with most of the coasts that meet with mountains, too, by placing an elevation between that of the mountain and coast in the part between. Note that the Lost Island mountains look like vertebrae, and so have little spines coming off of the edges, which looks pretty cool, actually.
It now looks kinda like Arctic Camouflage, huh?
Still not touching that vulcano with a ten-foot pole, though.
Step Ten:
Now we fill in the spaces between any protrusions or contours of the mountains; They should be a bit lower (and thus darker), and are also wider than the bands we've been adding, looking more flat like plains.
Then, once we've done that and finished our mountains, find a few shades between the darkest part of the mountain and the lightest of the plains, and make bands of those colours between until they meet up. Congratulation! You have now made a map. If it were loaded now, though, it would still be a bunch of terraces (which might actually be cool...), and, of course, there is still that gap to fill between the 1 and 0 elevations. So work is yet to be done.
Step Eleven:
Now, make a new layer (it doesn't matter what kind) and colour it red. Bright, eyeball-stabbing red. Then move it behind the transparent layer we've been painting on, but in front of our map. You will likely see something as below, with ugly red spots all over. Pixel by pixel using the pencil tool, colour in the red pixels with one of the elevations adjoining it. When that is done, you now have an image that with some resizing could be put through lndromat as-is, but it still would not look realistic.
Also, I shouldn't have to tell you that if you didn't fill in the sides with 0 elevation earlier, now is the time to do it. Just don't fill the gap in yet. Trust me, don't do it.
Step Twelve:
Here is why we don't fill in the gap.
Go to all the places that are not too close to the coast, which will be easy to see because of the red bar that surrounds it, and blur it 80%. I'm not sure if the blur convolve tool works differently in other editors, as i has been a while since I've used them, but in the GIMP just set the bottom bar from 50 to 80. Go over it until everything looks smooth and pretty and almost sort of 3D-shaded, as seen below.
Now fill in the gap. Make sure there are no pixels that got cut off if you use bucket fill (as you should), and if there are, fill them in with single-pixel pencil tool. You now have a completely greyscale version of the original map. Merge the layer down twice, and you have a single layer. Easy.
Step Fourteen:
Resize the image so that the larger dimension (height or width) is 256 pixels, and make sure the dimensions are locked, so that the smaller dimension changes proportionally.
Then copy and paste it into the middle of a 512x512 Greyscale (make sure it is greyscale or grayscale, NOT RGB colour or another setting) image with a black (0-0-0) background, and save it both as a .raw and a .bmp if your editor can't open .raws, the latter being so that if you messed up you can get back in and fix it and then resave it. Easy stuff.
Step Fifteen:
Holy crap, a lot of steps. Now just run it through lndromat. Lndromat is easy to use, the hard part is getting the .raw heightmaps that follow the parameters--No greater than 256 KB, meaning only the center 256x256 pixels have stuff in them, 512X512 RAW Image format and greyscale. If all that works, there should be no problem.
As to which landscape to use for your textures, Land 5 has the greatest variety and most realistic, Land T (God's Playground) some attractive and novel ones, Land 3 some interesting and unique ones but not great, and Land 4 some volcanic or blasted-looking textures. I went with Land 3 at first, thinking it might have what I was looking for, but then switched to Land 5 because it didn't.
To change what map you get the textures from, just run lndromat again with all the same raw, dds and so forth actions, and choose Land _ instead of the previous option, then save over the old file with the same name.
PROTIP: Make sure when you are naming your landscape to append it .lnd, since lndromat doesn't do it automatically.
Step YE GODS IS IT OVER YET???
No.
But from here on out it gets fun.
Now open it in Surveyor:
See? It worked. And then Go to
Edit
-->Mode Land Editor.
Then right click on the landscape in the window, and select "Block Countries." Scroll through the schemes until you find one that covers most of your landscape, noting that the top of the scheme is what will be at the highest elevations and the bottom will be the lowest accordingly, and click "Apply to entire land" or something to that effect. Click okay.
Now, you should have a good scheme. I tried a couple until I got it, and one was just to display the architecture of the land.
Finally, when you've got it, save the landscape (Surveyor may take a while, be patient), and open a text file (or Express Map Editor) and paste the following into it:
START_GAME_MESSAGE("TEST", 0)
ADD_GAME_MESSAGE_LINE("TESTING LAND", 0)
VERSION(2.300000)
SET_LAND_NUMBER(0)
LOAD_LANDSCAPE(".\DATA\LANDSCAPE\YOUR LAND.lnd")
START_CAMERA_POS("2611.00,2694.00")
SET_TOWN_INFLUENCE_MULTIPLIER(0.400000)
SET_PLAYER_INFLUENCE_MULTIPLIER(3.200000)
SET_NIGHTTIME(1700.000000, 0.083000, 0.070000)
CREATE_CITADEL("2148.71,1934.10", 0, "PLAYER_ONE", 900, 1000)
CREATE_TOWN(0, "2193.47,1813.45", "NEUTRAL", 0, "CELTIC")
CREATE_TOWN_CENTRE(0, "2193.47,1813.45", "CELTIC_ABODE_TOWN_CENTRE", 2932, 1000, 0)
Having done so, replace YOUR LAND with the correct land name, and use Surveyor to find some more appropriate coordinates, and paste them in the place of the coordinates I have up there. Now, save that file into C:/.../Scripts/Playgrounds as something you can remember, making sure the landscape is also in the Landscapes folder in Data, and select "Preview Map" and "Skirmish" in Express, or just open the game and go to skirmishes. Select the name of your text file.
Voila! You've now done a whole lot more than most people. But there is still more if you are a perfectionist like me.
(Note that the land will appear small at first, this is because there is no stuff on the land for scale except your temple, which always seems to be larger than you remember.)
Step Wait, more?:
Now, if you have some terrain that is rocky or snowy, but that doesn't appear so in your landscape already, go back into Surveyor and select "Block Countries" over the part you want to edit. Find a scheme that has the right terrain at that height, and push your brush size to 32 and get to painting. If you hit the edges, make sure you go along the same part of the edge on the adjoining square, as well, and if it is on the right or bottom edge let your brush fall halfway off of the block, because otherwise there will be a thin line that is not coloured in later. Continue doing so until the area that you need coloured are so, and repeat for all areas with a different scheme. Then look at it--If you see some lines in between the coloured area (not the blue lines that are added as a grid by Surveyor, but lines of the texure you have on most of the land), go back and make sure you have that edge right on both sides, and that you have gone slightly off the edge on the square where it is at the bottom or right.
I had to do this for the vulcano, which is snowy and rocky.
The result:
Now all that's left is to make a script for it, but that's a different tutorial altogether.
The next tutorial will be on complicated scripts, and then the one after that I suspect on another method of making landscapes.